|
Tying the Puglisi Threadfin Shad by Byron Begley Baitfish patterns tied with Puglisi EP fibers are realistic, versatile and they catch fish. You can easily design a three dimensional baitfish to match what you have in your waters. One benefit from using EP fibers is they are easily colored with Prismacolor markers and Sharpie pens. So you can add bars or dots when required. If trimmed correctly the baitfish is broader in the front and slender in the rear portion. That is important if a fish is following your fly. It looks realistic and three dimensional from behind. It looks real. Also, you can't buy these flies or at least I have not seen them. Using EP fibers allows you to make translucent minnows that blend in with their surroundings like real minnows do. That is especially important when fishing clear water in streams, lakes and the ocean. Or you can make them bulkier so they push water. The possibilities are endless. The fibers do not absorb water. When you pull one off the water it becomes very light and easy to cast. There are two important characteristics to remember about EP fibers that make them perfect for tying baitfish patterns. They are somewhat kinky. So, when they are left long the fibers support each other and tend to stick together allowing your minnow body to keep it’s 3-D shape in the slender part of the body. Another characteristic is when they are cut short in the front portion of the body they stick out like a bad haircut. This gives the fly bulk in the front end and the belly, again giving the impression of a fat front end and three dimensional. Learning to trim the fibers to achieve the shape of a minnow takes practice. Tying these flies take time too. A small minnow pattern can take 30 minutes to tie. A large tarpon fly can take an hour or more if you are particular about the end product. But, they are durable. You can catch several fish on one fly. You can cast them all day. And they work. Just don’t want to leave them on the dash of your truck on a hot day. They will fluff up and look like a cotton ball. Leave them in boxes or packaged in plastic tubing and they will store well. Important: When you purchase EP Fibers they are packaged in a plastic bag. When you remove them you will need to secure one end or you will have a mess and lose a lot of fiber. I have used a rubber band or two and wrap one end. That works well. Lately I’ve been using small wire ties available at your neighborhood home improvement store. I like that better. The threadfin shad lives in most large rivers and lakes in the Southeast. They are an excellent forage fish because they don’t grow to be too large and they spawn at different times in the Spring until Fall so there are often different sizes available. They do not tolerate cold temperatures well so in our part of the region there can be large die-offs that make them easy prey during the harsh winters. A lot of large trout have been caught when dead or dying threadfin shad are flushed through the turbines from our lakes into the tailwaters. When that happens you want to be there. But the populations bounce back after the cold winters. Threadfin shad have been introduced to many watersheds to enhance the fishery. They are not always native to your waters. I found a great photo and story about these minnows in the book “The Fishes of Tennessee” by David Etnier and Wayne Starnes. In this book is a photo of every fish found in Tennessee. It has proved to be invaluable to me as a source for tying baitfish patterns. You can purchase it at the University of Tennessee Press in Knoxville.
|
 |
|---|
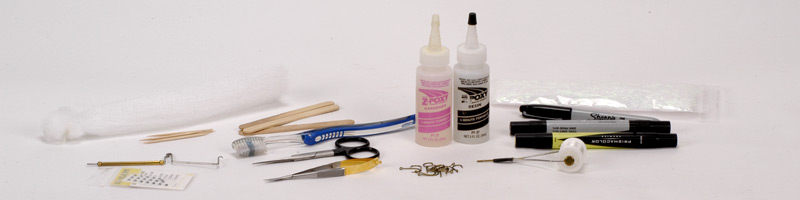
Materials: Puglisi EP Fibers White Tiemco TMC 105 Egg Hook #4 or #6 Mono Thread .006 Prismacolor Marker - Cool Gray Sharpie Marker Black with fine point Z-Poxy or any 2 part 5-minute epoxy Hologram Dome Eyes size 1/8" or 5/32" |
Tools: Hair Scissors Small Tip Spring Scissors Tooth Brush Craft Sticks Tooth Picks Post-It-Notes |
       |
The vise I’m using allows me to tie vertically. The jaws stay out of the way and I can rotate the fly almost 180 degrees while trimming. Your vise may not have this feature but it is not a problem if does not.
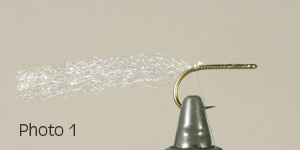
This fly will end up being 2” long when tied on a #4 egg hook. On a #6 hook the fly ends up about 1” to 1 ¼” long. Place the hook in the jaws and starting at the hook eye wrap back to the bend. Use monofilament thread in size .006. Select a group of strands of EP fibers. Don’t use too much. If you pull the material taught and it is about the thickness of the lead in a wooden pencil you have the right amount. Tie in the hank on top of the hook. Cut the fibers a little longer than you want the finished fly to be. Cut excess fibers in front of your wraps.
Take the fibers you cut from the top and tie in on the bottom of the hook shank in the same place you tied in on top. I make a couple of wraps with the hank on the side of the hook facing me then pull them underneath. Make a few more tight wraps. Cut excess fibers in front of your wraps and at the rear to the same length as the first hank you tied in.
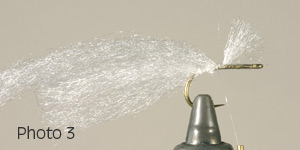
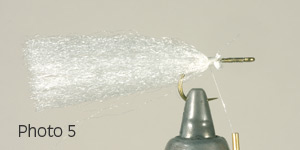
Then advance your thread just forward of the first wraps. At this point your EP fibers on the bottom are on one side of the hook. Turn your vise so the eye of the hook is pointing toward you. Separate the fibers and move half of them to the other side of the hook. Now you have fibers on the underside on both sides of the hook.
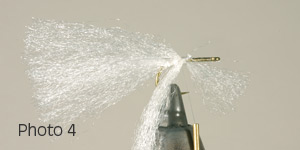
When you tie in the next hank of fibers on top, let the fibers roll onto the sides to cover up the wraps from your previous step. That way the thread wraps won't show through. Don't try to do this with the hank you tie in on the bottom. That is almost impossible.
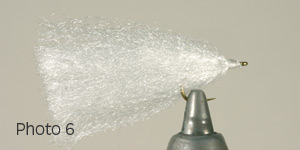
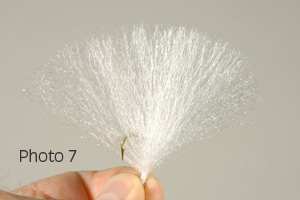
Repeat these steps until you have worked your way to the eye of the hook (Photo 6). The number of steps required to do this depend on how much material you are using and the finished size of the fly. Once you have covered the hook shank with fibers, form a head, whip finish and cut off the thread. I should mention now that there is another step I skipped on this fly. That one is adding EP Sparkle. This material adds flash to your fly. I'm not using it here because where we are fishing with these flies now the water is very clear and the flash is turning the fish off. EP Sparkle is a bag full of random lengths of synthetic flashy material. You can tie some in on the sides and top between each step of tying in the EP Fibers. Much of the Sparkle will be trimmed away later and it adds a lot of appeal to the fly. So, keep that option in mind. Remove the fly from your vise and lay flat on your table. Using a tooth brush stroke the fibers from front to back on both sides of the fly. Brush the fibers in a fanned out pattern (Photo 7). Go to Page 2 by CLICKING HERE |
|---|
| Please also check out our main website www.littleriveroutfitters.com for daily fishing reports, message board and online catalog. |
|---|
 |
|---|