 |
|
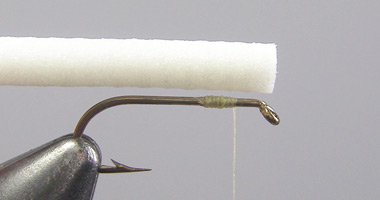
Step 1- Lay down a double layer of thread just ahead of the 2/3 point on the hook shank where you mount most dry fly wings. I measure the foam post against the hook shank, making it about a shank length. One of the nice things about foam post is the fact that you can trim post to suit your needs after you have finished tying the fly.
|
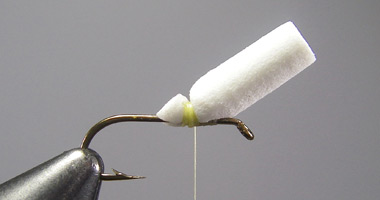 |
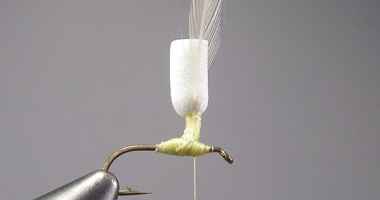
Step 2- Tie in the foam post on top of the hook. Make 5 or 6 wraps around the post, pull on the butt of the post and trim the butt close and at short steep angle. The short angled cut will help you make a nice tapered body when you add your hackle fibers for the tail.
|
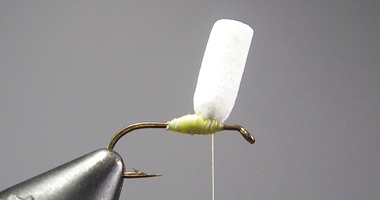 |
Step 3- Pull the post up and back. Next build a thread dam in front of the post to help it stand upright. Cover the butt of the foam post with thread wraps.
|
 |
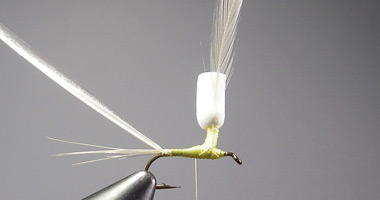
Step 4- Wrap the thread up and down the post 3 or 4 times. Prepare and size a hackle. Now tie in the hackle against the wing base with the shinny side facing you. Run the thread up and down the base of the post covering the hackle stem.
|
 |
Step 5- Select 6-8 hackle fibers from a spade hackle from the side of your neck. Butt the ends of the tail fibers up against the angled cut from the foam post. This should help you make a nice tapered body
|
 |
Step 6- Tie in the Turkey biot by the tip at an angle to help get the first wrap started. I tie in the biot with the concave side facing me.
|
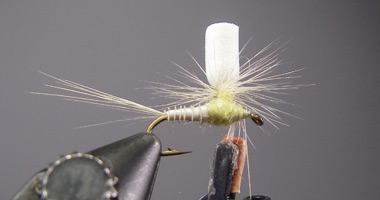 |
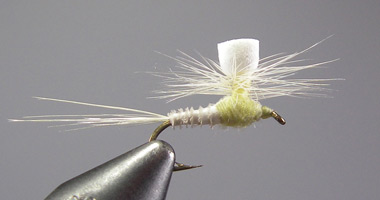
Step 7- Wrap the biot to a point just behind the post in close turns and tie off. Dub the thorax making it slightly larger than the body of the fly. Pull the hackle down to soften the stem. Now start at the top of the thread wraps and wrap the hackle counter clock wise down the post in touching turns until you are almost touching the dubbing for the thorax... 4 or 5 turns are usually enough for a fly this size. Let your hackle pliers hang on the far side of the hook. The weight of the pliers will help hold the hackle in place for the next step.
|
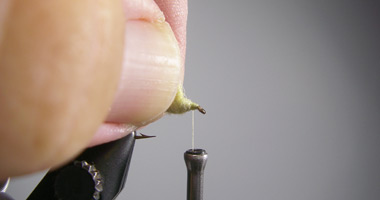 |
Step 8- Take you thumb and forefinger and gather and pull all the hackle fibers and post up and back. It helps to wet your fingers for this step to trap the loose hackle fibers. This will help prevent trapping hackle fibers when you tie off the hackle tip and form the head. Now cross the thread over the hackle tip between the hackle pliers and the body trapping the hackle stem. 2 or 3 times should be enough to trap the hackle stem. Now you can finish the head of the fly. After you have finished the head of the fly you can pull all of the hackle and post back down into its original position. It helps to pull the hackle fibers downward and out to help re-position them.
|
 |
|
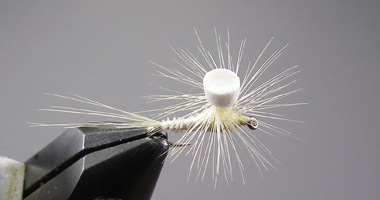
Step 9- Your hackle fibers should radiate out from the post evenly and should extend to about the end of the body. It helps to have rotary hackle pliers to wrap the hackle, and try to keep the hackle under constant tension while wrapping it.
|
|
|
Step 10= Finished fly.
|
|
|
|