Tying the Modified Chaos Hopper by Steve Yates Grasshoppers are one of the most familiar insect groups in World. There are about 600 species of hoppers in North America alone. Grasshopper activity usually peaks during the hottest days of summer which also often coincides with the lowest water levels and warmest water temperatures of the year. They hatch in late spring to early summer from eggs laid in the ground last fall. They have matured by this time of year and are often most active during the warmest parts of the day. Grasshoppers are large clumsy insects that frequently fall or are blown into the water while flying about. The original Chaos hopper was first tied by Roman Nyman of Blue Ribbon Flies in West Yellowstone. Craig Matthews said "This is the best hopper pattern we've ever fished". The original pattern was just a foam strip tied to the hook with some legs and a few wraps of hackle. The next improved version incorporated a bullet head to make the fly easier to cast, and a piece of brightly colored foam tied on top of the fly to make it easier to see, and no hackle. I have simply combined the two flies to come up with a modified version. The fly is easy to tie; floats low in the water like the natural, and when stripped or twitched the rubber legs will often draw ferocious strikes. I have caught more large trout on hopper patterns than any other surface fly. This time of year a hopper dropper combination can be deadly. |
 |
|
|---|
 |
|
|---|
 |
Step 3- Start the thread behind the hook eye and wrap back to about the 1/3 point on the hook shank. Make several wraps around the foam and hook shank.
|
|---|
 |
Step 4- Pull the foam strip tight and upwards making a mark where the hook eye meets the foam with the hook eye.
|
|---|
 |
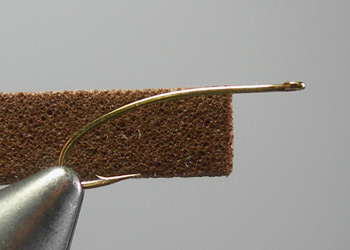
Step 5- Poke a hole in the foam with your bodkin or a large needle. Put a couple drops of super glue or Zap-A-Gap on the thread wraps and foam.
|
|---|
 |
|
|---|
 |
|
|---|
 |
|
|---|
 |
|
|---|
 |
|
|---|