Little River Outfitters Logo
106 Town Square Drive
P.O. Box 505
Townsend, Tennessee 37882
865-448-9459
Open 7 Days
Sunday thru Thursday 9 am - 5 pm
Friday & Saturday 9 am - 6 pm


Free CSS3 Menu Css3Menu.com

Fishing and Tying
Byron's
Knucklehead

By Byron Begley

Finished Black Knucklehead

Frank Brown holding a 4 1/4 pound smallmouth bass

This is my buddy Frank Brown from Richmond, Kentucky.  We started the first grade together in 1957.  This picture was taken in May 2012.  Frank and I had been fishing for a few hours with very little luck this day.  Frank cast a black Knucklehead next to the bank near a fallen tree.  A bass took his fly.  The fish jumped and we both thought he had a nice largemouth bass.  But then, the fish dove for the bottom, bending his 7 weight rod double.  It had to be a smallmouth.  The fish did not fight like a largemouth bass and when it jumped, it looked to be green. We landed the fish and sure enough it was.  It really was a green smallmouth bass as you can see in the photo. You can also see the black Knucklehead hooked to the stripping guide on Frank's fly rod.

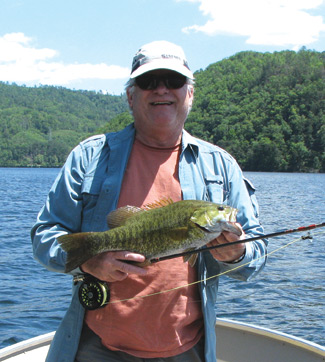
My friend from Georgia, Kent Edmonds invented the Stealth Bomber, one of the best flies I have ever used for bass.  His foam fly was designed for and works extremely well for many species of warmwater fish.  We sell these flies.  I use them often.  I would not be fishing without having Kent’s Stealth Bombers in my boat bag or vest. A few years ago I started tying shorter Stealth Bombers.  These flies didn’t have as much flash or the long tail and legs found on the original version.  The tail was made from a few fibers of short bucktail.  Jack Gregory and I found these less flashy flies worked well on the clear lakes where we fish for smallmouth bass.  We used mostly black flies with solid black legs.  We called them “Stillwater Bombers”.  One day, 4 years ago, he and I caught 83 smallmouth bass, ranging from 1 pound to 5 pounds using these new Stealth Bombers. The smallmouth bass were sipping them off the surface.  We returned the next week and caught over 60 in one day.  We will probably never have another two days of fishing like that, ever.

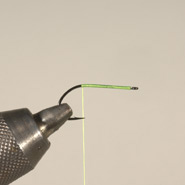
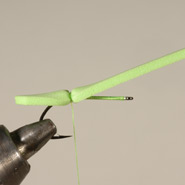
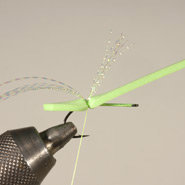
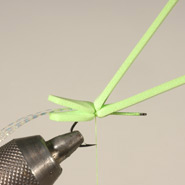
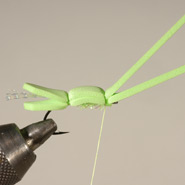
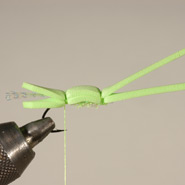
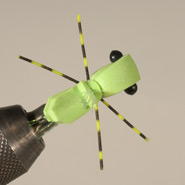
I decided to come up with a similar design that would float higher in the water.  That would require using 2 strips of 2mm foam instead of one.  The new fly would not have the ability to dive like the Stealth Bomber.  It would be more like a popper.  Our smallmouth bass around here seem to like a dead drift better on the lakes or rivers at times.  I tried all kinds of ideas.  I would come up with something new at night, then take it down to Little River after work the next day to see what it looked like in the water. Some designs landed upside down often. I made changes in the design.  I performed “drop tests” into a water vessel at home and counted how many times out of 100 the fly landed upside down.  I spent the Winter of 2011 working on this design.  I finally ended up with what you see here.

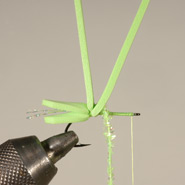
Over the course of December 2011 through March 2012 I tied over 300 of the flies to sell in the store.  I wanted customers to use these flies on the rivers and lakes. I was hoping to get some feedback, either positive or negative and I did.  My friends, Paula and I started fishing with them during 2012.  Jack thought the foam tail was too long causing him to miss some bass. I shortened the tail.

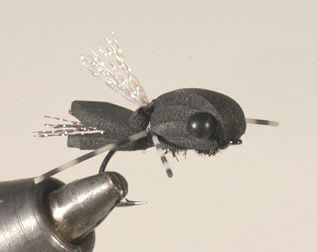
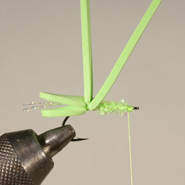
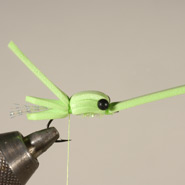
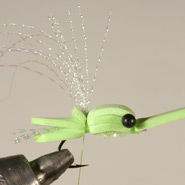
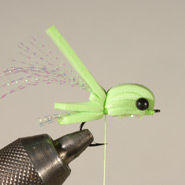
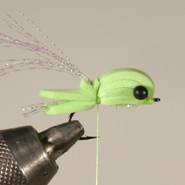
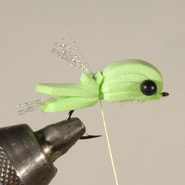
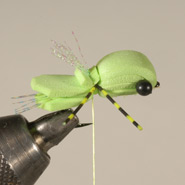
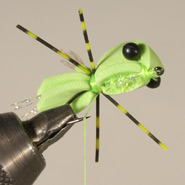
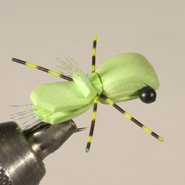
In the beginning I was applying Zap-A-Gap where the mono eyes were inserted. Evidently, the CA glue made the eye stems brittle. Sometimes the eyes would break off. I stopped using the glue. The eyes stopped breaking. Many changes were made. So, far, the results are impressive.  The best colors are black and chartreuse. I found a couple of flies on the internet named Knucklehead but they were not similar to this one at all. So, I named this fly Byron's Knucklehead to avoid confusion.

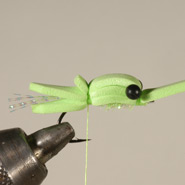
The Knuckleheads advantages are, they land light on the water, float high, they are easy to see and easy to tie. Bass, panfish and trout are attracted to them. They work. These flies are also very durable.


Tying Byron's Knucklehead

The Knucklehead is very easy to tie. It does not require anything but beginner fly tying skills. You need to know how to wrap thread around a hook and whip finish. Those are very easily learned beginner techniques. You will need a fly tying vise and a few inexpensive tools to get started. Here is the complete list of what is required to tie this fly:

Tools:
Vise, Exacto Knife, metal ruler, bobbin, scissors, large whip finish tool (optional), tooth picks

Materials:
2mm fly foam
Danville 210 denier thread or equivalent, color to match body
Extra large Mono Eyes, black or olive
Tail:  Krystal Flash or bucktail in colors to match the body
Wing: Krystal Flash in the pearl color
Pearl Chenille Small, color to match the body
Zap-A-Gap CA or equivalent waterproof super glue
Medium Round Rubber Legs – single color or barred
Hook:  Gamakatsu B10 S Stinger Bass Hook #6

Steps for Making Foam Stips

Step 1 - Cutting the Strips

You will need two foam strips to make one Knucklehead.  We sell Fly Foam in a package of two sheets measuring 3” by 4 ¼”.  The strips you will cut with your Exacto Knife will be 5/16” wide by 3” long.  I have found the easiest way to cut the strips is to measure over from the right side of the foam 5/16 of an inch (usually 1 mark past ¼” on most rulers) and push a sharp toothpick at the line on the ruler through the foam close to the top and bottom edge of the foam. This will leave a small hold in the foam at each end of the strip. Lay your ruler on the holes, cut along the ruler with your knife and you will have a 5/16” wide strip that is 3” long. I usually cut plenty of strips and tie several flies at one sitting. Pick two strips that will be used on a fly.  Lay one strip on top of the other and line them up (Figure 2).  Then, with your scissors cut straight across the foam, cutting away the holes left by the tooth pick (Aprox. ¼”).  Next, make two cuts creating a sharp shape on one end of the foam strips.  They should look like Figure 3 on one end. Since you are cutting both strips at once, the shape should be about the same for both at one end of the strips.  Use these two almost identical strips for your fly.

Wrapping the Thread

Step 2 – Wrapping the Thread

Start your 210 denier or 3/0 thread at the eye of the hook and wrap back to the beginning of the bend.  When hanging down, your thread should touch the point of the hook.  Before moving to Step 2, place a drop of Zap-a-Gap or other CA on the thread where you stopped wrapping the thread at the hook bend.  When you wrap on the first strip of foam the fly will not shift or turn on the hook after the glue sets up.

Adding the First Strip of Foam

Step 3 – Applying the First Foam Strip

Lay one of the pieces of foam you shaped for this fly on the top of the hook and thread.  You should have a drop of Zap-a-Gap at the tie in point.  Hold the foam with your non-tying hand and bend it slightly around the hook.  Wrap your thread around the hook shank and foam.  Start with one slightly tight wrap then increase the tension on the final three wraps.  Let your bobbin hang.  Pull up each end of the foam so it will not be glued down to the hook except where you have your wraps. Let the glue set for a couple of minutes before moving to Step 4.

Photo of tying in Krystal Flash at the Tail

Step 4 – Tying in the Krystal Flash at the Tail

Choose a few fibers of Krystal Flash to tie in at the tail of the fly.  I like to use the same color of flash as the body or something close to that color.  Leave enough Krystal Flash in the front so you can grasp it later to cut off the excess. If you use bucktail, tie in a sparse clump and let the ends of the hair extend slightly past the end of the first foam strip, about 1/4".

Photo shows trimming the extra Krystal Flash.

Step 5 – Trim the Excess Krystal Flash

With your non-tying hand grasp the excess Krystal Flash toward the front of the fly and clip it off with your scissors.  You do not need to cut it close to the wraps.  This area will be covered with another piece of foam. If you are using bucktail, do the same thing.

Applying the Second Foam Strip

Step 6 – Adding the Second Foam Strip

Now you are ready to add the second strip.  Lay it on top of the first strip and line up the back edges as close as you can.  They don’t have to be perfectly aligned.  Hold the second strip with your non-tying hand and wrap 4 tight wraps at the same tie in point as the first strip.  I always make the first wrap a little softer so I don’t cut the foam with the thread.  After one layer is down, you can tighten the second through 4th wraps. Trim the Krystal Flash leaving about 1/4" sticking out between the two foam strips.

Wrapping the Pearl Chenille Body

Step 7 – Attaching Pearl Chenille to the Hook

Cut a piece of Pearl Chenille about 12” long.  You will use this one piece to make several flies.  Wrap your thread around in front of the foam strips on the hook.  Tie in the Pearl Chenille and wrap your thread to the hook eye.

Tying Off the Pearl Chenille Body

Step 8 – Forming a Under-Body with the Pearl Chenille

Wrap the Pearl Chenille to the hook eye covering the hook shank and under-layer of thread.  Wrap your thread around the chenille about three times then trim the excess chenille.

Tying Down the Foam Strips at the Eye of the Hook

Step 9 – Securing the Foam at the Eye of the Hook

You can simply pull both pieces of foam down parallel to the hook shank and secure them with about 4 wraps of thread.  I prefer to secure the first foam strip with three wraps then fold down the second strip and do the same thing.  I believe this keeps the head from turning on the hook.  It is a stronger way to secure the strips.  Whip finish the thread where the strips are wrapped on the hook.  An extended reach whip finish tool works best.  You have to wrap around those long pieces of foam still remaining on the fly.

Re-Starting Your Thread at the Original Tie In Point

Step 10 – Re-starting the Thread

At the original tie in point, re-start your thread making about three wraps.

Putting the Eyes in Place

Step 11 – Setting the Eyes

Lay a set of Mono Eyes near the eye of the hook.  Do not use glue to hold the eyes in place.  You won’t need it.  CA glue causes the eye stems to become brittle and break.

Folding Back and Securing the Strip and the Eyes

Step 12 – Securing the Eyes and Forming the Wing Base

Hold the eyes in place with your tying hand and pull the foam strip back to the tie in point with your non-tying hand.  Hold the foam in place with your non-tying fingers and make 4 wraps.  Those wraps should be tight. 

Trimming the First Strip

Step 13 – Cut the Wing Base

Using straight scissors, cut the excess foam from the strip you just secured.  Leave some foam sticking up.  That will cause your Krystal Flash wing to stand up on the fly at a slight angle.

Attaching the Krystal Flash Wing

Step 14 – Attaching the Wing

I don’t know if the wing is important to the fish, but it is very important for you to see this fly.  The wing is very visible on the water.  You are going to double the amount of strands of Krystal Flash in this step. Cut a few strands (5 to 8) of pearl colored Krystal Flash to make a wing.  Hold the strands with your non-tying fingers.  Lay the strands on top of the fly.  You should have about 1” of the fibers extending from the tie in point toward the eye of the hook.  Make about two wraps to secure the wing to the fly.  Half of the strands will be several inches long.  The other half will be 1” long.   

Folding Back and Securing the Second Strip

Step 15 – Securing the Second Foam Strip

Now you can pull the second foam strip back and secure it to the fly using 4 tight wraps.  Allow your bobbin to hang loose and move to step 16.

Cutting the Excess Foam from the Second Strip

Step 16 – Trimming the Second Foam Strip and Forming the Front Flap

Hold the excess foam with the fingers of your non-tying hand.  Using straight scissors, cut the foam shorter than the back piece of foam you cut earlier.  This leaves a flap that you will use as a thread guide.  You will be attaching rubber legs and your thread will be wrapped in FRONT of the flap you just made.  Also, your final whip finish will be wrapped in front of that flap.

Trim the Excess Krystal Flash to Form a Wing

Step 17 – Trimming the Wing

Grasping the Krystal Flash wing with the fingers of your non-tying hand, cut the wing with your straight scissors.  Don’t make the wing too long.  It will catch wind and blow the fly over on it’s side.  I usually trim the wing to about 1/2” long.  In your non-tying fingers you will be holding some long Krystal Flash fibers.  Save them for the next fly.  Dispose of the short pieces.

Attaching the First Pair of Rubber Legs

Step 18 – Attaching the Rubber Legs

Cut a piece of rubber leg material about 1 ½” long.  Your bobbin should be hanging down.  Form a loop with the rubber leg material around the thread.  Even up the ends and grasp them with your fingers of your non-tying hand.  Grasp your bobbin and raise it up and around the fly, wrapping in front of the flap.  The thread will pull the rubber leg material into the side of the fly forming a “V” in the legs.  Make another wrap around the body, in the “V” of the legs and in front of the flap.  Let your bobbin hang. 

Underside View of the Knucklehead
Complete the same step on the other side of the fly.  You will now have two legs sticking out of each side of the fly. Whip finish using about 4 wraps around the fly, passing through the "V" of the legs on each side and wrapping in front of the flap. Trim the thread.

Top View of a Finished Knucklehead

Step 19 – Finishing the Knucklehead

To make this fly extremely durable you will need to apply Zap-A-Gap to the wraps where the body and legs are tied in and at the head.  Add a drop of Zap-A-Gap to the point of a tooth pick.  With the fly still in your vise, touch the tooth pick to the body wraps.  Move the pick up to and between the legs.  You will need to do this on both sides while covering the bottom of the fly at the wraps.  Add another drop to the tooth pick and coat the exposed thread at the eye of the hook on the bottom and sides of the wraps.  That’s it, the Knucklehead is finished.

A Finished Knucklehead

Fishing Tips

Don’t use fluorocarbon leaders.  They sink faster than extruded nylon leaders.  When you pull the fly out of the water to cast again the fluoro leader will pull the fly under.  This can cause you to get hung on the bottom of shallow streams and pull the fly under in lakes unnecessarily.  Use nylon leaders. Use a non-slip loop when tying on the fly. 

When the fly hits the water let it sit.  Allow the fly to drift with the current in rivers.  You may give it a small twitch but most often just let it sit still.  The bass will know it is there.  They will be watching it.

Copyright 2021 Little River Outfitters, Inc. All rights reserved.